How do I implement user registration?
We recommend representing each user in your system with a unique user in TrueVault. This allows you to maximize the value you get out of our access control and audit log capabilities. It also saves you the time and effort of creating and maintaining secure authentication and user management.
There are two common patterns we see for user registration in our customers applications: self-registration and invite-only. In the self-registration flow, any user can come to your product and register for a new account. They don’t need to be invited. In the invite-only flow, some administrative user will invite new users manually and configure their access. In some applications, both flows are used simultaneously. For example, you might want self-registration for patients but invite-only for medical staff. We’ll describe both approaches here.
Note that both approaches have a bit of inherent complexity because the Create User endpoint requires authentication. This means that an authenticated user must be the one who creates new users. In the invite-only flow, this is intuitive. In the self-registration case, we have to create a special “Registration System User” to perform the authenticated API Requests. We’ll dive into the details below.
Invite-Only
In the invite-only flow, an administrator will create a new user and invite them to use your product. That administrator may configure which data the new user can access by adding that user to an existing group, or creating a special group for that user.
The administrator user will need to have special permissions to perform this task. She should be a member of a group with the Create permission on User:: as well as the whatever permissions she needs to put that user in the right group so the new user can access the right data. She can do this by:
-
Adding the user to an existing group. Assume this group has an id
aaaaaaaa-aaaa-aaaa-aaaa-aaaaaaaaaa. To do this, the administrator will need to have the ability to add a new user to that group. This is expressed with a policy that hasCreatepermission on the resourceGroup::aaaaaaaa-aaaa-aaaa-aaaa-aaaaaaaaaa::GroupMembership::.*. Read this as “the admin can add any user (.*) to the group with idaa...a.” This flow works well with our ownership permissions, since a single group can ensure each member can only see their own data. -
Creating a new group entirely. This is sensitive and requires some careful thought. If the administrator needs to create a new group, she must have the
Cpermission on theGroup::object. Granting her this permission means that she can create a group with total-admin permission and put herself in it. If this is worrisome (i.e. she doesn’t already have such global access) then you’ll need to perform this group-addition logic from your server, so you can prevent abuse.
Self-Registration
In the self-registration flow, you’re allowing anybody who finds your app or site to create a new account. Let’s look at the high level steps you’ll have to take:
1) Request a username and password pair from the user (along with other personal information you may need). 2) Create a new user in TrueVault. 3) Put the new user in an appropriate group so they can access the TrueVault data they need to see. 4) Optionally pass the new user’s TrueVault Id to your custom server to act as a foreign key.
Let’s run through each step with some example code.
Sign Up Form
You want to let the user pick a username and password that will be stored in TrueVault. Note that we recommend you never send this data to your server and instead send it directly to TrueVault from the client side. If you’re working on a web project, the sign up form might look like this:
1 2 3 4 5 6 7 8 9 10 11 12 13 14 15 16 17 |
<form id="signup-form"> <div class="form-group"> <label for="name">Name</label> <input type="text" id="name" name="name" placeholder="Joe Smith"> </div> <div class="form-group"> <label for="username">Username</label> <input type="text" id="username" name="username" placeholder="Username"> </div> <div class="form-group"> <label for="password">Password</label> <input type="password" id="password" name="password" placeholder="Password"> </div> <div class="form-group"> <button type="submit" class="btn btn-default" id="auth-submit">Sign Up</button> </div> </form> |
This asks the user to enter their name, chose a username, and chose a password then sign up. Next up, we show how to handle the submit action and create this user directly in TrueVault.
Create a User
When the sign up for is submitted, we want to make a request to the Create User endpoint in TrueVault. We’ll use the official TrueVault JS SDK to do this.
Here’s the tricky part: to use the TrueVault Create User endpoint we have to be authenticated, but we don’t yet have an end-user to authenticate as. This authentication requirement is to protect your account from unwanted user creations. Since you are letting people self-register, this precaution isn’t required for your application. We can get around it by embedding an API Key for a “Registration System User” - a user that is only permitted to create other users in TrueVault. It’s really important this user can’t do anything else but create other users, since we are publishing its API Key for anyone to see (this is pretty much the only case where it is OK to publish an API Key).
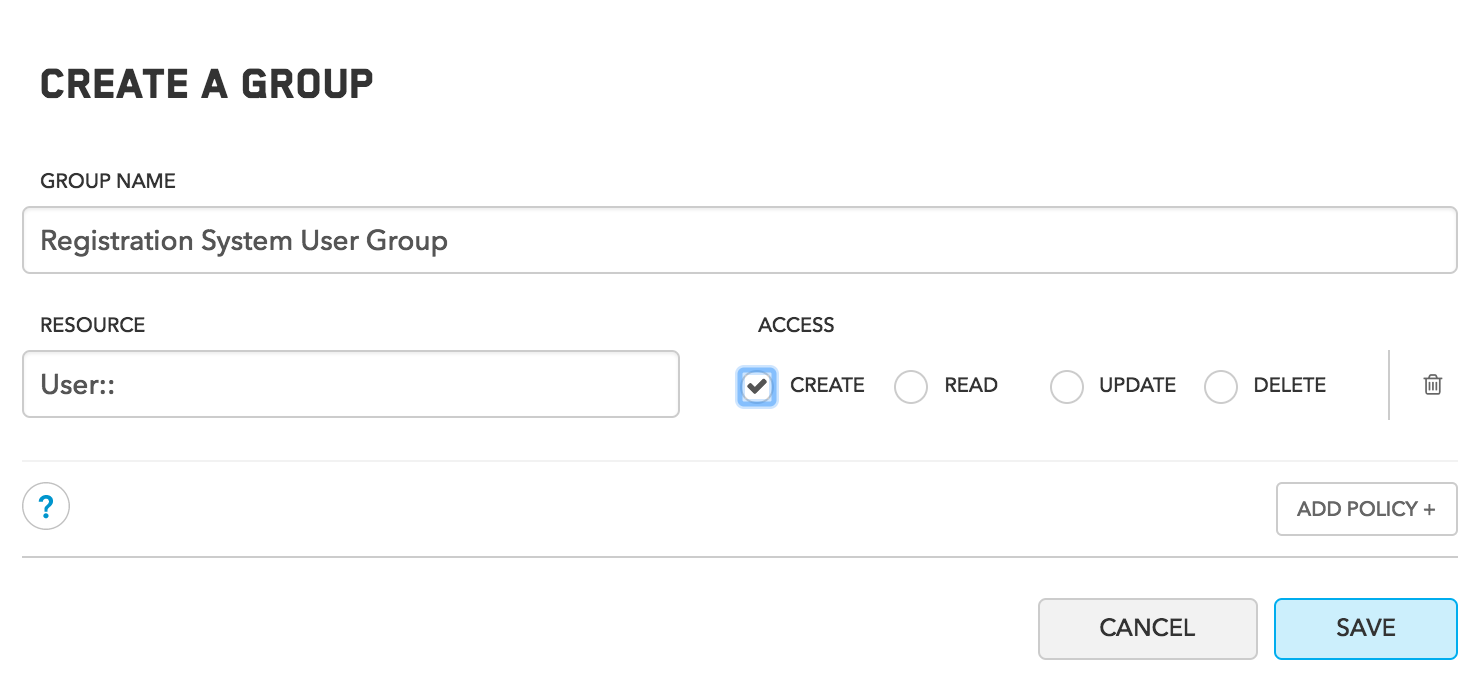
In the TrueVault Management Console, create a new user with the username registration-system-user and no password. Copy that user’s ID. Then create a new group, the “Registration System User Group” with a policy that allows the C action on User::. It would look like this:
Now add your registration-system-user to this group by selecting the newly created group and clicking the Add button on the right side under Users. Paste the user id you copied (a long UUID, not the name).
Return to the user in the management console and generate a new API Key For that user by clicking on the reassign button under the user’s ID. Confirm when prompted, and save the API Key that is returned somewhere; it will not be shown again.
Now we can use that registration user to actually submit your form. Continuing our web example, you might have a submission handler that looks like this:
1 2 3 4 5 6 7 8 9 10 11 12 13 14 15 16 17 18 19 20 21 22 23 24 25 26 27 28 |
<head> ... <script src="https://unpkg.com/truevault@0.2.0/build/index.js"></script> ... </head> <body> ... <form id="signup-form"> ... </form> </body> <script> const createUserTvClient = new TrueVaultClient(<PUT REGISTER USER API KEY HERE>); async function registerUser(name, username, password) { userAttributes = {full_name: name} tvUser = await createUserTvClient.createUser(username, password, userAttributes); } authFormEl.addEventListener("submit", async e => { e.preventDefault(); authPromise = registerUser(this.username.value, this.password.value); // Other stuff after registration succeeds }); </script> |
This code snippet shows how you can pull the TrueVault JS SDK into your web app with one line of code and how you can create a new user with one simple call to TrueVault. The username and password are required fields. The attributes object can be any plain object you want: we use it to store the name field with as full_name in our TrueVault user record.
Add User to Group
By default, newly created users have no access to any data in TrueVault. If you’d like this user to be able to create, modify, and read Documents or BLOBs, you need to put them in a group that grants this access.
For example, if all users in your application can see and modify their own data but not see or modify anyone else’s data, then you might setup a “normal user” group like this:
[
    {
        "Resources":[
            "Vault::0000000-0000-0000-0000-000000000000::Document::$[Owner=self]"
        ],
        "Activities":"CRUD"
    }
]
This policy gives users the ability to Create, Read, Update, and Delete any document in vault 0000000-0000-0000-0000-000000000000 (put your real Vault ID here).
You can create this group ahead of time in the TrueVault Management Console and then store the group ID in your application source. Then, after creating a user you could add a line like this:
1 2 3 4 5 |
...
tvUser = await createUserTvClient.createUser(username,
                password, userAttributes);
createUserTvClient.addUsersToGroup("<THE GROUP ID>", [tvUser.id]);
...
|
This snippet takes the newly created user and adds it to your “Normal User Group”, giving this new user the ability to read and modify their own data, but preventing them from accessing any other user’s data.
Remember that the createUserTvClient uses the Registration System User you created earlier. That means any request from that client is authenticated as the Registration System User and can only perform operations that user is allowed to perform. We’ll have to update the Registration System User group to allow this operation. In other words, the Registration System User needs the power to add this new normal user to the Normal User Group. We can add that permission with a policy in the Registration System User’s group that looks like this:
[
    {
        "Resources":[
            "Group::1111111-1111-1111-11111111111::GroupMembership::.*"
        ],
        "Activities":"C"
    }
]
Assuming the group you created above had an id 1111111-1111-1111-1111-111111111 then this would allow the registration user to add any new user to that group.
Now that the registration system user can add your new users to groups, the registration process is complete.
Save User Id
Many customers use TrueVault to store their PII and store de-identified data in their own (non-compliant) infrastructure. If you’re doing this, you probably want to notify your server that you’ve just registered a new user with TrueVault, by sending the user’s ID to your server.
You probably do not want to send their full_name or username fields, since those are likely identifying and should only be kept in TrueVault. Just send the opaque identifier TrueVault created.
What’s next?
Once you’ve created the user and added it to groups, the user can now log in and store/retrieve data. Their access to TrueVault data will be governed by the group policies you created, so you know that this user will not be able to access unauthorized data. This “default-no” approach to authorization is an important part of building a compliant product. You also benefit from the detailed Audit Log without any setup on your side. TrueVault logs which users perform which actions for every request we serve. In the event of an audit, you’ll be able to easily show exactly which records are accessed by which individuals, which unauthorized attempts were blocked by TrueVault, and which users we active at any point in time.
To get a sense of how to build your application from here, take a look at our Sample Application.